Holes to drain water from roof/hood?flooded..maybe seal?
-
Hi again alexlotta :)
Be very careful with 'kitchen' products!!! they contain acids/solvents, which could attack plastics or start corrosion in steel etc, if you must, flush with lots of water after.
The 4 sunroof drain holes are about 6mm in diameter. take care not to 'push' any blockage further into the holes!
Just read the last part of your 'first' post,
The 'floorpan' drain caps you mention, I think have to be removed from UNDER the car!
I think there is one for each front footwell and also one for each of the rears.
If they are difficult to remove, then drill a 6mm hole into them and the water should drain away but maybe a little slower than if you removed the caps?Take care under the car!!!! please 'chock' two wheels and use at least two axle stands if using a scissor jack!!! :shock:
If I ever work under my car, I have two spare wheels that I stack under the highest part under the car, then if the worst should happen :( you will get a second chance!! :D
Hope this helps?
kev b.
PS where are you in the world?
-
Here still high humidity gonna do old fashion way for the floor (cleansing manually what i can for now) .
If cap are inside its though did'nt see .For replacement part gasket, i heard one of my city got a crash , gotta have a search for that one.
Where i'm based ?
I'm italian , north italian actually .
City is Triest , border with Croatia and Austria.
( which is sort of different people ,
though usually in the world they see us as stereotypically "all the same" lol ).
-
Checked still did'nt sort (just cleaned from water)
"Headlining" ,excuse me but i'm not sure .
It's the inner of the electric hood ?
or interior of the fix part - roof?
one of those 2 i assume ,have to figure out how to removeBecause looking online i see photos of generic interiors .
i will have to bring to fix it i think if "sunnny days dont come "
(little annoyance also rear water "spray" also stopped working though motor is running) .
Also , about the "gasket " part , i did 'nt get why i would have to remove the hood to pull it off/on?
Anyway tomorrow gonna look again patiently , i 'll have a couple of hours i hope.
-
Hi alexlotta,
Headlining = interior roof panel, fabric trim (whole roof)
Sunroof = electric hood (clip on rectangle trim panel attatched)
I have a 'crash' car also, so will take photograph of stripped roof interior, it has all trim removed and you will see how things are fixed/ removed.
Rear 'spray', clean by inserting sewing needle in hole to clean, pipe may be squashed at top also?
could be dirt in bottle? clean out, re fill with water, put in 1 baby sterilizing tablet to keep clean if not used often?
Electric roof panel gasket = It comes off in a down direction so would be very difficult to refit if electric hood not removed first.
Is the 'crash' cars electric roof panel the same colour as your cars? :(
Will try and take photograph of removed headlining tommorow 30 /10 /13
I am trying to type to make translation easier??? :oops:
I like Italy it's the birthplace of 'Lancia' and the Strato's :respect:
kev b.
-
Much more clear now with the terms ! TY .
(what i did call gasket is "seal" actually ,lol)About spray , Following you tip, tried needle and did'nt do anything sadly .
The only part of pipe i see (under the rear port, the "double L" pipe little portion ) is not squashed. Minor problem for now.
Never heard about Baby-sterilizing method before ^,but i dunno how dirt would have be there
My car is american black
named "Carlotta" (well ..my surname is "lotta" ..go figure why i named like that) ,some photos here
http://s162.photobucket.com/user/alexlotta/library/CarLotta
(i'm not the guy who cleans , i have long hairs)
-
Hi hope you can make sense of these photographs? :)
 ,pull down at front, three poppers/clips and slide trim forward) (pic above))
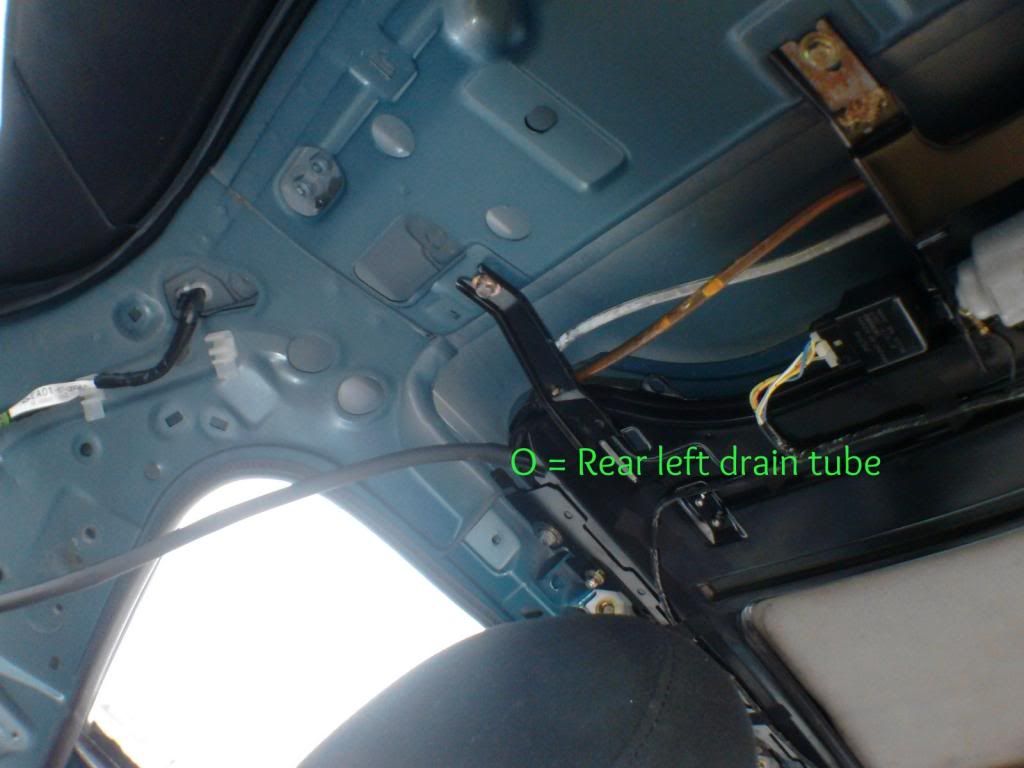
This is the position of the Rear left drain tube (above)
)
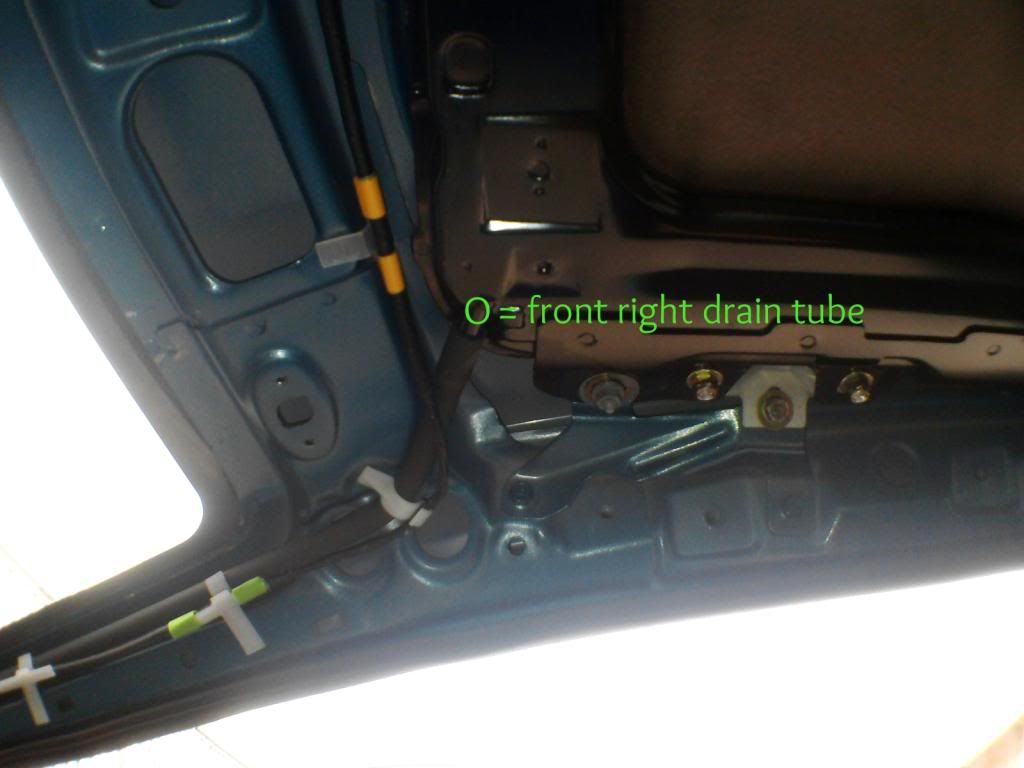
Hope these help with your leak problem alexlotta of Italy? :)
kev b.
-
did'nt have connection those 2 days.
THANK YOU A MILLION for the photos !!!!!!!!!!!!!!!!!!!!!!!!!It's raining and still did'nt sort,now gonna look at your pics carefully.
It's to remove the inner parts ,and tubes are far from sunroof
that's why did'nt find them Oo ,
will have to bring to tech to do it i'm afraid dont have garage and weather is terrible.Man , how much i would offer of drinks for that kindness ^^
Big Hug ,
Alex
-
Happy you're happy with photographs :)
Please…. before you remove anything, use a coloured liquid like very dilluted white water-based paint and pour on car where rain water would collect,
1.Around sunroof panel (electric roof seal) roof closed.
Then open roof fully and squirt liquid into tray at the four corners.2.Into the two roof gutters where it meets the windscreen glass.
3.around the windscreen seal.
4.Around the door top seal.
Do the above 1-4, one at a time, check inside the car for coloured liquid after each test.
You can do these tests yourself before you give to 'tech' and waste your currency. :(
:cheers: kev b.
-
1 tech :"i dont do roofs, if i do i change everything i meet for safety"
2 tech well , it will be 400 upwards (at the phone wothout to see the car)So .. desoerate and thanks to your suggestion ,on my launch pause (and the only sunny day ) i removed the front plastic arch splash guard .
Found the tube ! after removing another screw , putted a" laundry cable "
(metal inside , plastic wrapped) and then on the way til the roof , 3 times .Yesterday it was heavy raining , and i did check twice , and also today.
No "big water" whatsoever , just a bit of moisture on the roof ,
but on the side and back ,
not frontally flooded like it was.
Let's cross finger .
Thanks for the tips , they give me the "strenght" to do at least tht alone ^^
-_______________________________-Next would be to do similarly on remaining tubes , but i have to figure out
How to access Rear tubes from Below the Car.
..when it will stop to be so WINDY weather !! (here we are 160 kh wind today Oo ).
-
Happy you found location of one front drain tube! :)
The rear ones are behind the rear wheels, under the bumper/fender,
You can either remove rear bumper (big job :( )
Or you can remove boot/trunk plastics (even bigger job :( :( ), when these are removed there is an access hole in bodywork each side, that leads to the stale air vents and in the same place you will see the rear drain tubes exiting the bodywork, you can pull these into car and use your laundry cable again, without removing rear bumper/fender? :D
Another idea, check for gaps in the windscreen gasket/seal trim surround? and where the outside roof gutters meet the windscreen gasket/seal? :shock:
Fingers crossed kev b.
PS; are there many MX3's in Triest, Italy? :o
-
Well last big rain , did'nt get wet forward ( just laterally a bit and also on rear roof headlining i sensed a bit ) so i think seal of windscreen is ok.
The rear drain stuff looks difficult , cannot do on street like i did with forward ones as you tell me.
I have to research a bit the english terms to get it correctly("stale" air vents),
And then plastics in the floor , or angles of the boot .Useful to know anyway.________________________-
How many In triest? now we are 2 ( we were 5 til 2 years ago , 1 sold for "foreign exporation" , 2 had accident) .
One red , owner is a blondie who i know does/did some " escort " kind of job and mine (black) .
Due to stupid italian law i had to let go a Mx3 with only 60.000 km
(wanted to keep for spares but you cant here ,you have to "hide it "somewhere and it's anyway not law allowed )
Forgot to mention =
my car has motorized automatic belts.
Really cool , but findingparts in the case should be painful i think
-
alexlotta:
Your MX3 has the American \ Canadian style seat belts.
This is the link to the American OC with lots of Canadian members.
http://www.mx-3.com/phpBB3/index.php
Be easy to find parts on there for it.
If you want a quick way of clearing the rear sunroof drain pipes, use a stiff cable, like RF (TV) or RJ45 (Computer network) and feed it down.
-
thanks lory !, in fact using laundry cable was quite the same approach ( and i did look at antenna cable as you see on my posts , just did'nt find one hanging around in my house).
Rear tubes are more difficult to reach than front ones
(front tube =just remove mudguard/mudflap behind front tyres , and you reach them easily) .
Good tip nevertheless , useful for future reference for other people.Going to check canadian forum , though is always better find parts in Europe (customs stuff and long pricy shippings)
-
Hi ya alexlotta.
Well after the 'Last big rain'!! If the rear of headlining is wet then there is a good chance its the rear sunroof draintube that side?Did you park the car in a different direction, angle?
The boot/trunk plastics are fairly easy to remove, just take your time and if things can not be removed easily, then there is probably 'one more' screw to be removed!!!
More pics to help?
This is what you should see?…... look towards the white 'grid' shaped object (stale air vents).... these just let out 'bad', 'damp', 'smelly', air from the car interior, and make the last door to be closed easier to shut, by releasing air pressure.
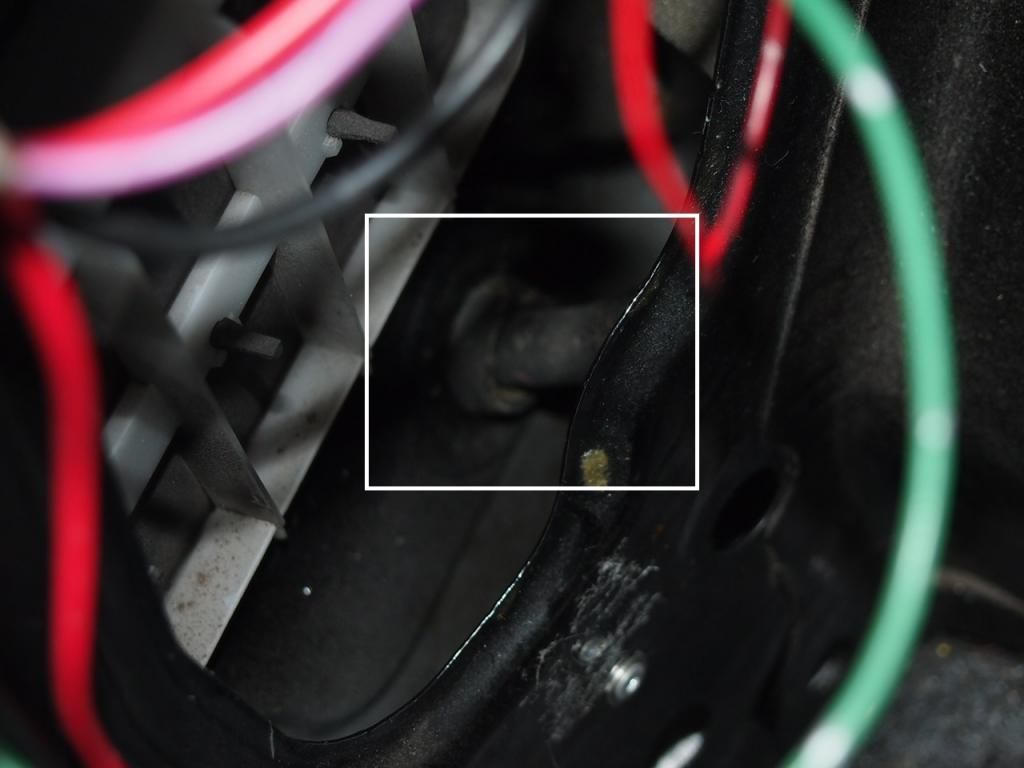
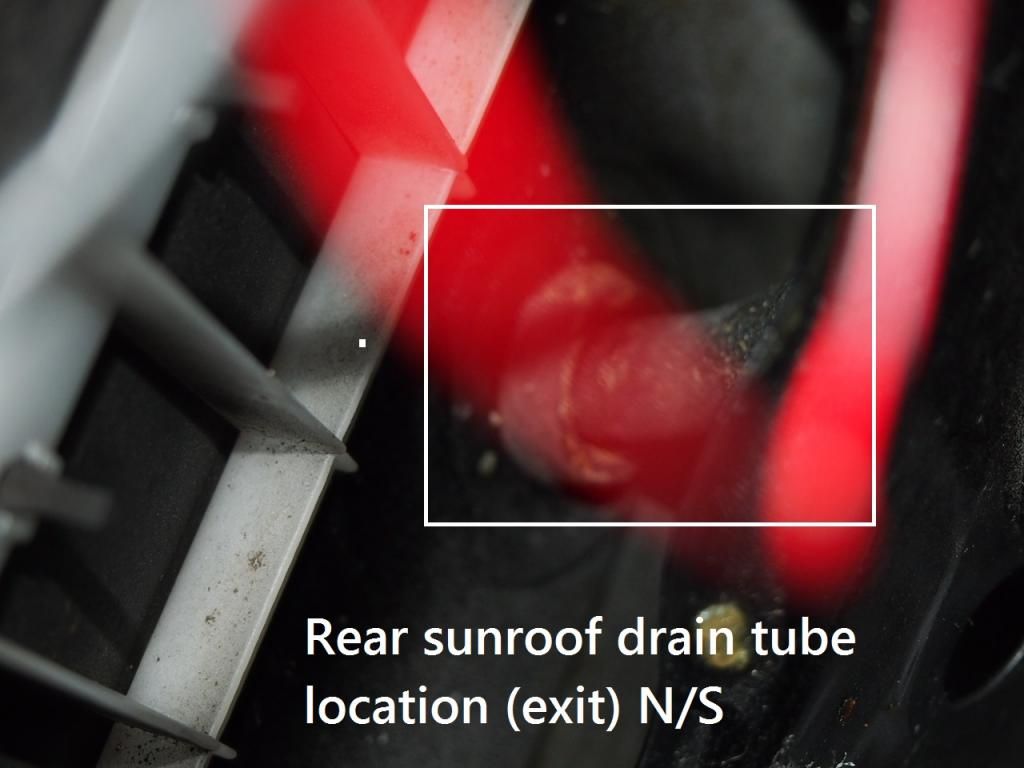
Pull this tube into the car and use your laundry cable once more, perhaps over a bucket in case you clear the blockage? :shock:
Once you have finished make sure you replace the tube back into the grommet in the outer bodywork.The other side is the same, it's just a different shaped hole in the inner metalwork.
Hope this helps? :D
kev b.
-
Bro you are magic , gonna save pics and study them .
I parked the car with front slightly up ( on a "walkable"step ) ,but not so much ,enough to use the screwdriver (lol my setup is too low frontly) .
But when i tried water it went out .
EDIT:t looks like rear tube are reachable without to remove anything!! , can be?EDIT2:they are not (only left rear and curves too steep)


![http://i1297.photobucket.com/albums/ag28/blackmexyv6/eaccf551-8e5b-427e-bc68-c3441e10eed8_zpseb8c8afc.jpg[/img][/url]](http://i1297.photobucket.com/albums/ag28/blackmexyv6/eaccf551-8e5b-427e-bc68-c3441e10eed8_zpseb8c8afc.jpg%5B/img%5D%5B/url%5D)
![http://i1297.photobucket.com/albums/ag28/blackmexyv6/P311013_1228_02_zps95c30fea.jpg[/img][/url]](http://i1297.photobucket.com/albums/ag28/blackmexyv6/P311013_1228_02_zps95c30fea.jpg%5B/img%5D%5B/url%5D)
![http://i1297.photobucket.com/albums/ag28/blackmexyv6/P1018625_zpsaddd0732.jpg[/img][/url]](http://i1297.photobucket.com/albums/ag28/blackmexyv6/P1018625_zpsaddd0732.jpg%5B/img%5D%5B/url%5D)